最近流行のお掃除ロボットを作って見ました。
開発方針は、
①市販材料、汎用品を使い低予算で開発する(5,000円程度)
②WEBブラウザから運転操作を行う。
③実用的な成果を得る。
と決めました。
ロボットの設計と製作
ロボットの完成写真
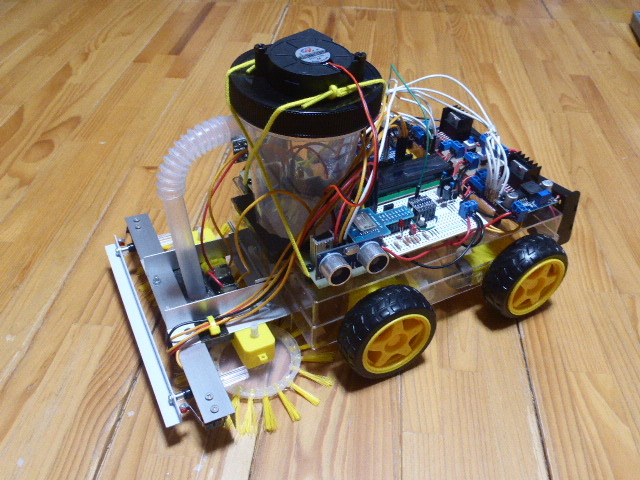
この掃除ロボットは4輪駆動で真空発生部はサイクロン方式を採用しています。
ロボットの設計概念
当初、マイコンをESP-Wroom-02のみで作ろうと考えたのですが、IO点数やモーターへのPWM出力などを検討して行くとどうしても足らなくなり、ArduinoUNOとの混成で構築することに決めました。
ESP-Wroom-02は、WiFiコネクションがあるので、WEBサーバーとして機能させ、ブラウザからの運転操作用に、ArduinoUNOはロボットの制御用としています。
ロボットは車体前部バンパーの左右に取り付けた2つのリミットスイッチ、車体前部バンパー下部に取り付けた反射型フォトインタラプタ、車体左右に取り付けた超音波測距センサーを搭載しています。
駆動系は4つの車輪に独立したDCモーターをPWM速度制御を行うことで、前後進、左折・右折、左・右旋回などが可能です。
掃除機能としては、左右の回転ブラシが中央に向かって回転し、集まったゴミをサイクロン式吸引部が吸い取る方式で実現しています。
一方、マンマシン系として、運転表示用に16桁LCDディスプレイをロボットに搭載しています。
制御系として、手動操作と自動運転があり、手動はWiFi経由でのブラウザからの操作、自動運転はブラウザからの運転指示による自動運転を行います。
自動運転には、ランダム運転と壁沿い並行運転の2つのメニューから選べるようになっています。
ロボット回路図
ロボットの回路図を次に示します。
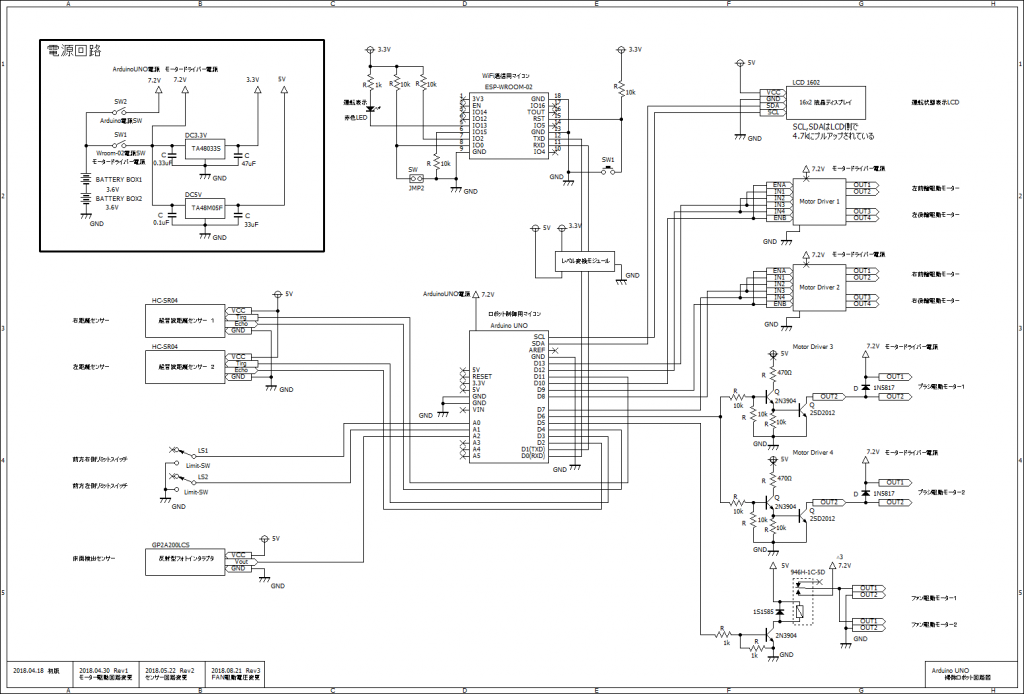
回路図で示しているように、ESP-Wroom-02とArduinoUNOはシリアル通信線で接続しており、ESP-Wroom-02がブラウザから得た操作指令をシリアル通信にてArduinoUNOに送信しています。
この時、それぞれの操作源電圧が違うのでDC3.3V-DC5Vのレベル変換を行っています。
ロボット制御プログラム
ESP-Wroom-02側プログラム
/*
* V0.00: VacumRobot用ESP-Wroom-02プログラムの作成。
* ArduinoUNOと通信を行う。
* WiFi経由でWebサービスを提供し、ロボットへの指令を受ける。
* 受領した指令をシリアル通信でArduinoUNOへ送る。
*/
#define PROG_NAME "(VacumrobotOTA_0V000)"
#include <Ticker.h>
#include <ESP8266WiFi.h>
#include <ESP8266mDNS.h>
#include <WiFiUdp.h>
#include <ArduinoOTA.h>
#define LED_BLINK 13
Ticker ticker1;
//******************
IPAddress ip(192, 168, 0, 132); //ip
IPAddress gateway(192,168, 0, 1);
IPAddress subnet(255, 255, 255, 0);
IPAddress DNS(192, 168, 0, 1);
WiFiServer server(80);
//******************
const char* ssid = "my_SSID";
const char* password = "my_PassWord";
static int count_sec = 1;
void OTA_setup(){
ticker1.attach_ms(100, count_down);
pinMode(LED_BLINK, OUTPUT); // Initialize the LED_BLINK pin as an output
/******************
WiFi.config(ip, gateway, subnet, DNS); //static_ip
delay(100);
//******************/
}
void count_down() { // 100ミリ秒ごとのタイマー割込み
static int sub_counter = 10;
if(--sub_counter <= 0){
sub_counter = 10;
count_sec--;
}
}
void led_blink(){
if(count_sec <= 0){
digitalWrite(LED_BLINK, !digitalRead(LED_BLINK));
count_sec = 1;
}
}
void OTA_loop(){
static int menu = 0;
led_blink();
// *** SERVER CONNECTION Check if a client has connected
WiFiClient client = server.available();
if (!client) {
return;
}
// Wait until the client sends some data
//*** Serial.println("new client");
while(!client.available()){
delay(1);
}
// Read the first line of the request
String req = client.readStringUntil('\r');
//*** Serial.println(req); // 返って来る文字列
client.flush();
// Match the request
if( req.indexOf("menu=0") != -1){
menu = 0;
}else if(req.indexOf("menu=1") != -1){
menu = 1;
}else if(req.indexOf("opemode") != -1){ // send instruction to Arduino UNO
Serial.println(req.substring(13, req.indexOf(" HTTP")));
}
client.flush();
// Prepare the response
String s = "HTTP/1.1 200 OK\r\nContent-Type: text/html\r\n\r\n<!DOCTYPE HTML>\r\n<html>\r\n"
"<head><meta charset='utf-8'><style type='text/css'><!-- button.button1 { font-size: 1.4em; font-weight: bold; padding: 5px 10px;} --></style></head><body>";
if(menu == 0){
s += " <button class='button1' type='text' disabled>手動モード</button>"
" <button class='button1' type='button' onclick=""location.href='menu=1'"">自動モード</button><br /><br />";
client.print(s);
s = " <button class='button1' type='button' onclick=""location.href='opemode=0'"" disabled >           </button>"
" <button class='button1' type='button' onclick=""location.href='opemode=8'"">左折1</button>"
" <button class='button1' type='button' onclick=""location.href='opemode=2'"">前進2</button>"
" <button class='button1' type='button' onclick=""location.href='opemode=5'"">右折1</button>"
" <button class='button1' type='button' onclick=""location.href='opemode=0'"" disabled >           </button><br />"
" <button class='button1' type='button' onclick=""location.href='opemode=9'"">左折2</button>"
" <button class='button1' type='button' onclick=""location.href='opemode=10'"">左折3</button>"
" <button class='button1' type='button' onclick=""location.href='opemode=1'"">前進1</button>"
" <button class='button1' type='button' onclick=""location.href='opemode=7'"">右折3</button>"
" <button class='button1' type='button' onclick=""location.href='opemode=6'"">右折2</button><br />"
" <button class='button1' type='button' onclick=""location.href='opemode=19'"">旋回1</button>"
" <button class='button1' type='button' onclick=""location.href='opemode=20'"">旋回2</button>"
" <button class='button1' type='button' onclick=""location.href='opemode=0'""> 停  止 </button>"
" <button class='button1' type='button' onclick=""location.href='opemode=18'"">旋回2</button>"
" <button class='button1' type='button' onclick=""location.href='opemode=17'"">旋回1</button><br />"
" <button class='button1' type='button' onclick=""location.href='opemode=15'"">左折2</button>"
" <button class='button1' type='button' onclick=""location.href='opemode=16'"">左折3</button>"
" <button class='button1' type='button' onclick=""location.href='opemode=3'"">後進1</button>"
" <button class='button1' type='button' onclick=""location.href='opemode=13'"">右折3</button>"
" <button class='button1' type='button' onclick=""location.href='opemode=12'"">右折2</button><br />"
" <button class='button1' type='button' onclick=""location.href='opemode=0'"" disabled >           </button>"
" <button class='button1' type='button' onclick=""location.href='opemode=14'"">左折1</button>"
" <button class='button1' type='button' onclick=""location.href='opemode=4'"">後進2</button>"
" <button class='button1' type='button' onclick=""location.href='opemode=11'"">右折1</button>"
" <button class='button1' type='button' onclick=""location.href='opemode=0'"" disabled >           </button><br /><br />"
" <button class='button1' type='button' onclick=""location.href='opemode=26'"">FAN起動</button>"
" <button class='button1' type='button' onclick=""location.href='opemode=25'"">ブラシ起動</button>"
"<br /><br />";
}else{
s += " <button class='button1' type='text' disabled>自動モード</button>"
" <button class='button1' type='button' onclick=""location.href='menu=0'"">手動モード</button><br /><br />";
client.print(s);
s = " <button class='button1' type='button' onclick=""location.href='opemode=32'""> 停  止 </button>"
" <button class='button1' type='button' onclick=""location.href='opemode=33'"">掃除1</button>"
" <button class='button1' type='button' onclick=""location.href='opemode=34'"">掃除2</button>";
}
// Send the response to the client
s += "</body></html>\n";
client.print(s);
delay(1);
//*** Serial.println("Client disonnected");
// when the function returns and 'client' object is destroyed
}
void setup() {
// Serial.begin(115200);
Serial.begin(9600);
Serial.println("Booting");
WiFi.mode(WIFI_STA); // これをそのまま使う
//****** Add this for server *********
// WiFi.mode(WIFI_AP); // これ(WIFI_AP)はコネクションエラーになる
WiFi.config(ip, gateway, subnet, DNS); //static_ip
delay(100);
//***************/
WiFi.begin(ssid, password);
while (WiFi.waitForConnectResult() != WL_CONNECTED) {
Serial.println("Connection Failed! Rebooting...");
delay(5000);
ESP.restart();
}
//*****************************
// Port defaults to 8266
// ArduinoOTA.setPort(8266);
// Hostname defaults to esp8266-[ChipID]
// ArduinoOTA.setHostname("myesp8266");
// No authentication by default
ArduinoOTA.setPassword((const char *)"123");
ArduinoOTA.onStart([]() {
Serial.println("Start");
});
ArduinoOTA.onEnd([]() {
Serial.println("\nEnd");
});
ArduinoOTA.onProgress([](unsigned int progress, unsigned int total) {
Serial.printf("Progress: %u%%\r", (progress / (total / 100)));
});
ArduinoOTA.onError([](ota_error_t error) {
Serial.printf("Error[%u]: ", error);
if (error == OTA_AUTH_ERROR) Serial.println("Auth Failed");
else if (error == OTA_BEGIN_ERROR) Serial.println("Begin Failed");
else if (error == OTA_CONNECT_ERROR) Serial.println("Connect Failed");
else if (error == OTA_RECEIVE_ERROR) Serial.println("Receive Failed");
else if (error == OTA_END_ERROR) Serial.println("End Failed");
});
ArduinoOTA.begin();
//**********************/
Serial.println("Ready");
Serial.print("IP address: ");
Serial.println(WiFi.localIP());
//***** Start the server (for server)
server.begin();
Serial.println("Server started");
OTA_setup();
}
void loop() {
ArduinoOTA.handle();
OTA_loop();
}操作画面
下図に操作画面を示します。
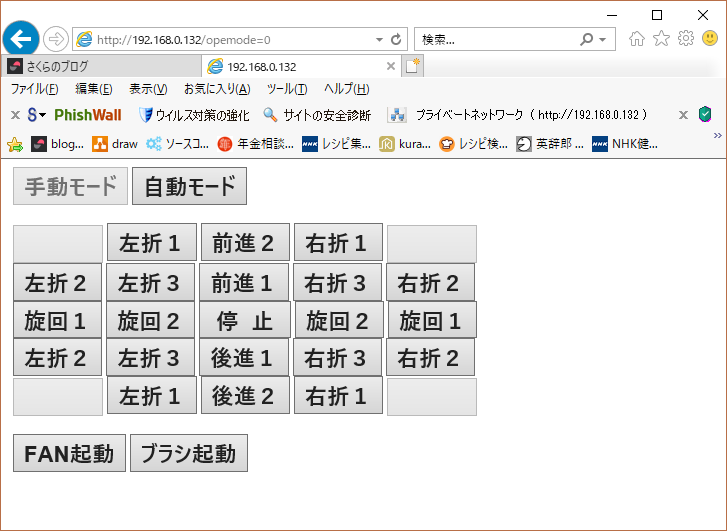
操作は、パソコン、タブレット、スマホなどから行えます。ブラウザから手動と自動モードを選択します。この表示画面では手動モードでの操作を行っています。
パソコンをはじめ、iPAD、スマホなどからブラウザを開き、192.168.0.132(固定)にアクセスすると操作画面が現れます。
このアドレスはサーバーとして機能しているESP-Wroom-02に接続され、上記プログラムが応答し、この画面送信しています。